What is Virtual Reality?
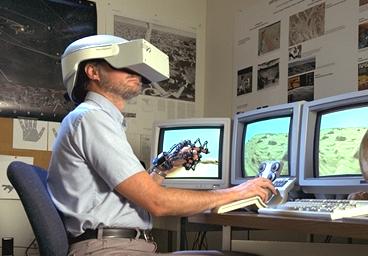
Before we even start talking about VR sceneries, it seems important to clarify what VR itself is. Virtual Reality is, as its name suggests, immersing the user in a reality other than the one we know, which can be fictional or realistic, through innovative technologies that affect our senses. Invented in 1970 by an American university, the first virtual reality headset allowed the display of a computer-assisted alternative reality through different images sent to each eye, while tracking the user’s head movements via a built-in gyroscope (motion and orientation sensor) to maintain the orientation of our gaze. A few years later (in 1982) a glove was invented with numerous sensors to analyse the user’s hand movements. Numerous attempts have been made to add other concepts, such as smells or force feedback machines to simulate touch, but their development is still too complex and too expensive to be marketed on a large scale and remains very much confined to professional large-format simulators.
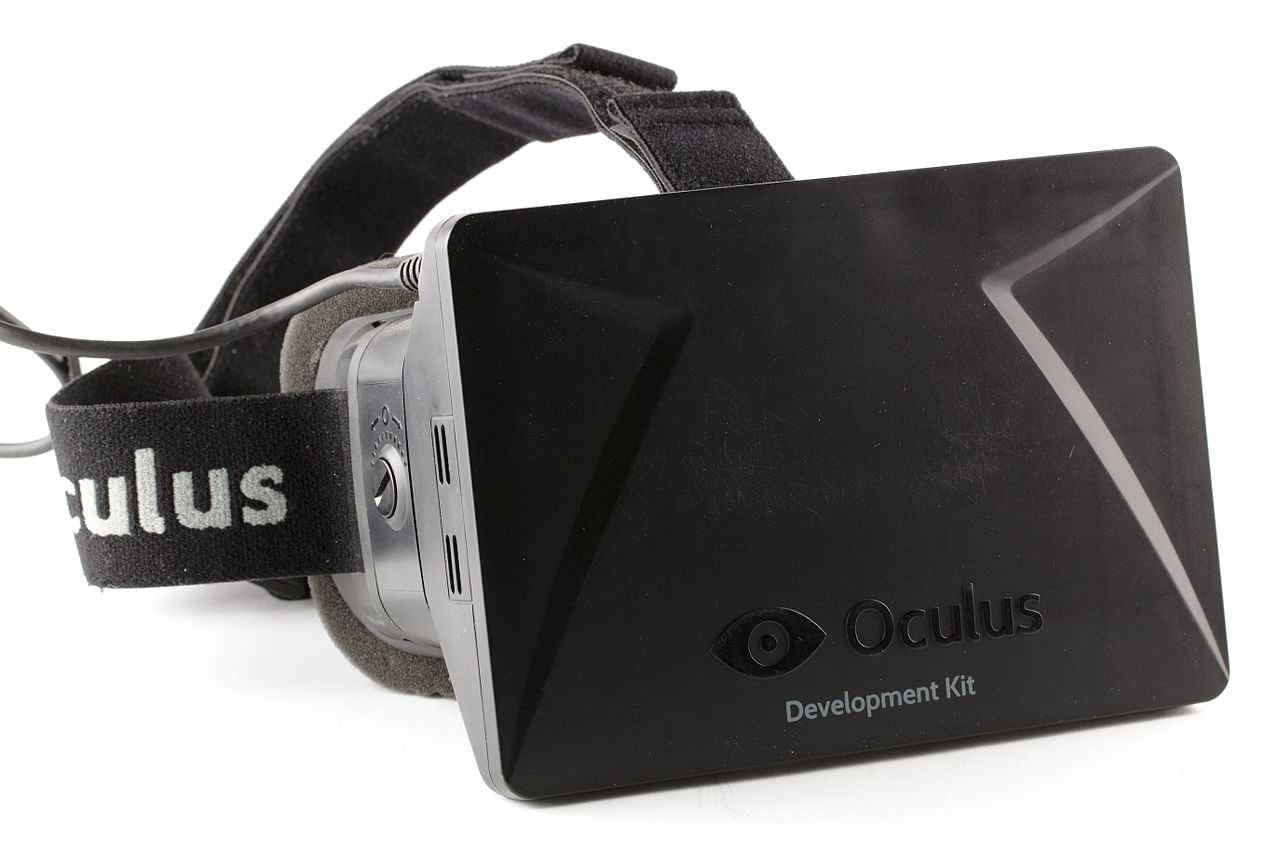
The general idea behind these devices is therefore to captivate our senses to make us feel things that do not really exist in reality, or to experience sensations that would be complex or risky to experience in real life. The democratisation of this technology thanks to the company Oculus, which, following participatory financing in 2013, was able to produce a headset at a lower cost, has considerably developed the digital market as well as that of cameras and 360 cameras. Long considered a niche tool, due to its price, which was still high, its growing use in various shows, technological or not, has had the effect of developing the attraction for this format among companies and even individuals. The company Sony has also enabled its expansion by offering a virtual reality headset for its Playstation console since 2016.
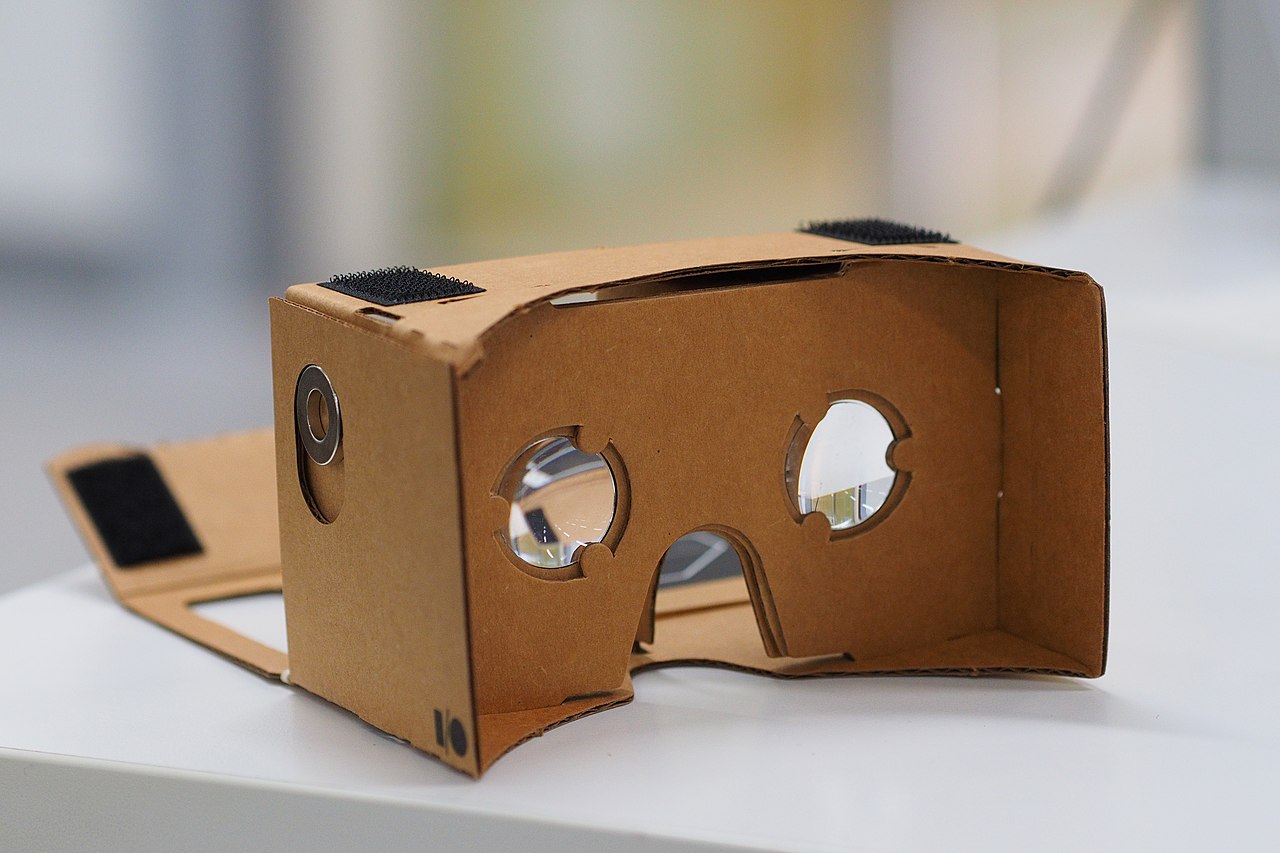
Finally, and with the deployment of smartphones, Google released in 2014 the very first virtual reality headset compatible simply with your phone, without any technology and therefore a completely ridiculous price. Mostly made of cardboard, these “VR glasses” were then called “Cardboard VR” (which literally means “made of cardboard”). This device allowed anyone to enjoy this technology, simply with a compatible application on their phone.
So that’s the background, but in concrete terms, how does it work? Well, instead of displaying a single image like a traditional screen, it is actually two “screens” that are each visible to one of our two eyes. So the left eye sees one thing and the right eye sees another, just like in real life. To illustrate this better, I suggest a little experiment. Look around you and find an object far enough away from you, any object. Close one eye and try to hide it from your view with your finger. Once you have done this, then switch the eye that is closed with the other one and you will notice that your finger has shifted to the side, revealing to your sight the object that you had hidden. This is called perspective. As the eyes are a few centimetres apart, each eye has its own point of view and our brain analyses these two “images” as what we see. It is also thanks to this distance that we are able to appreciate depth. The further away an object is, the more identical it will be for each eye; conversely, the closer an object is, the greater the differences (this is a consequence of Thales’ theorem). This is why our finger becomes completely blurred when we bring it too close to our face.
(I would like to take this opportunity to tell you that the system is exactly the same with 3D films in the cinema. The famous 3D glasses are made to hide a different part of the projected image for each eye, and thus differentiate our vision and give us an impression of depth).
What is a VR scenery?
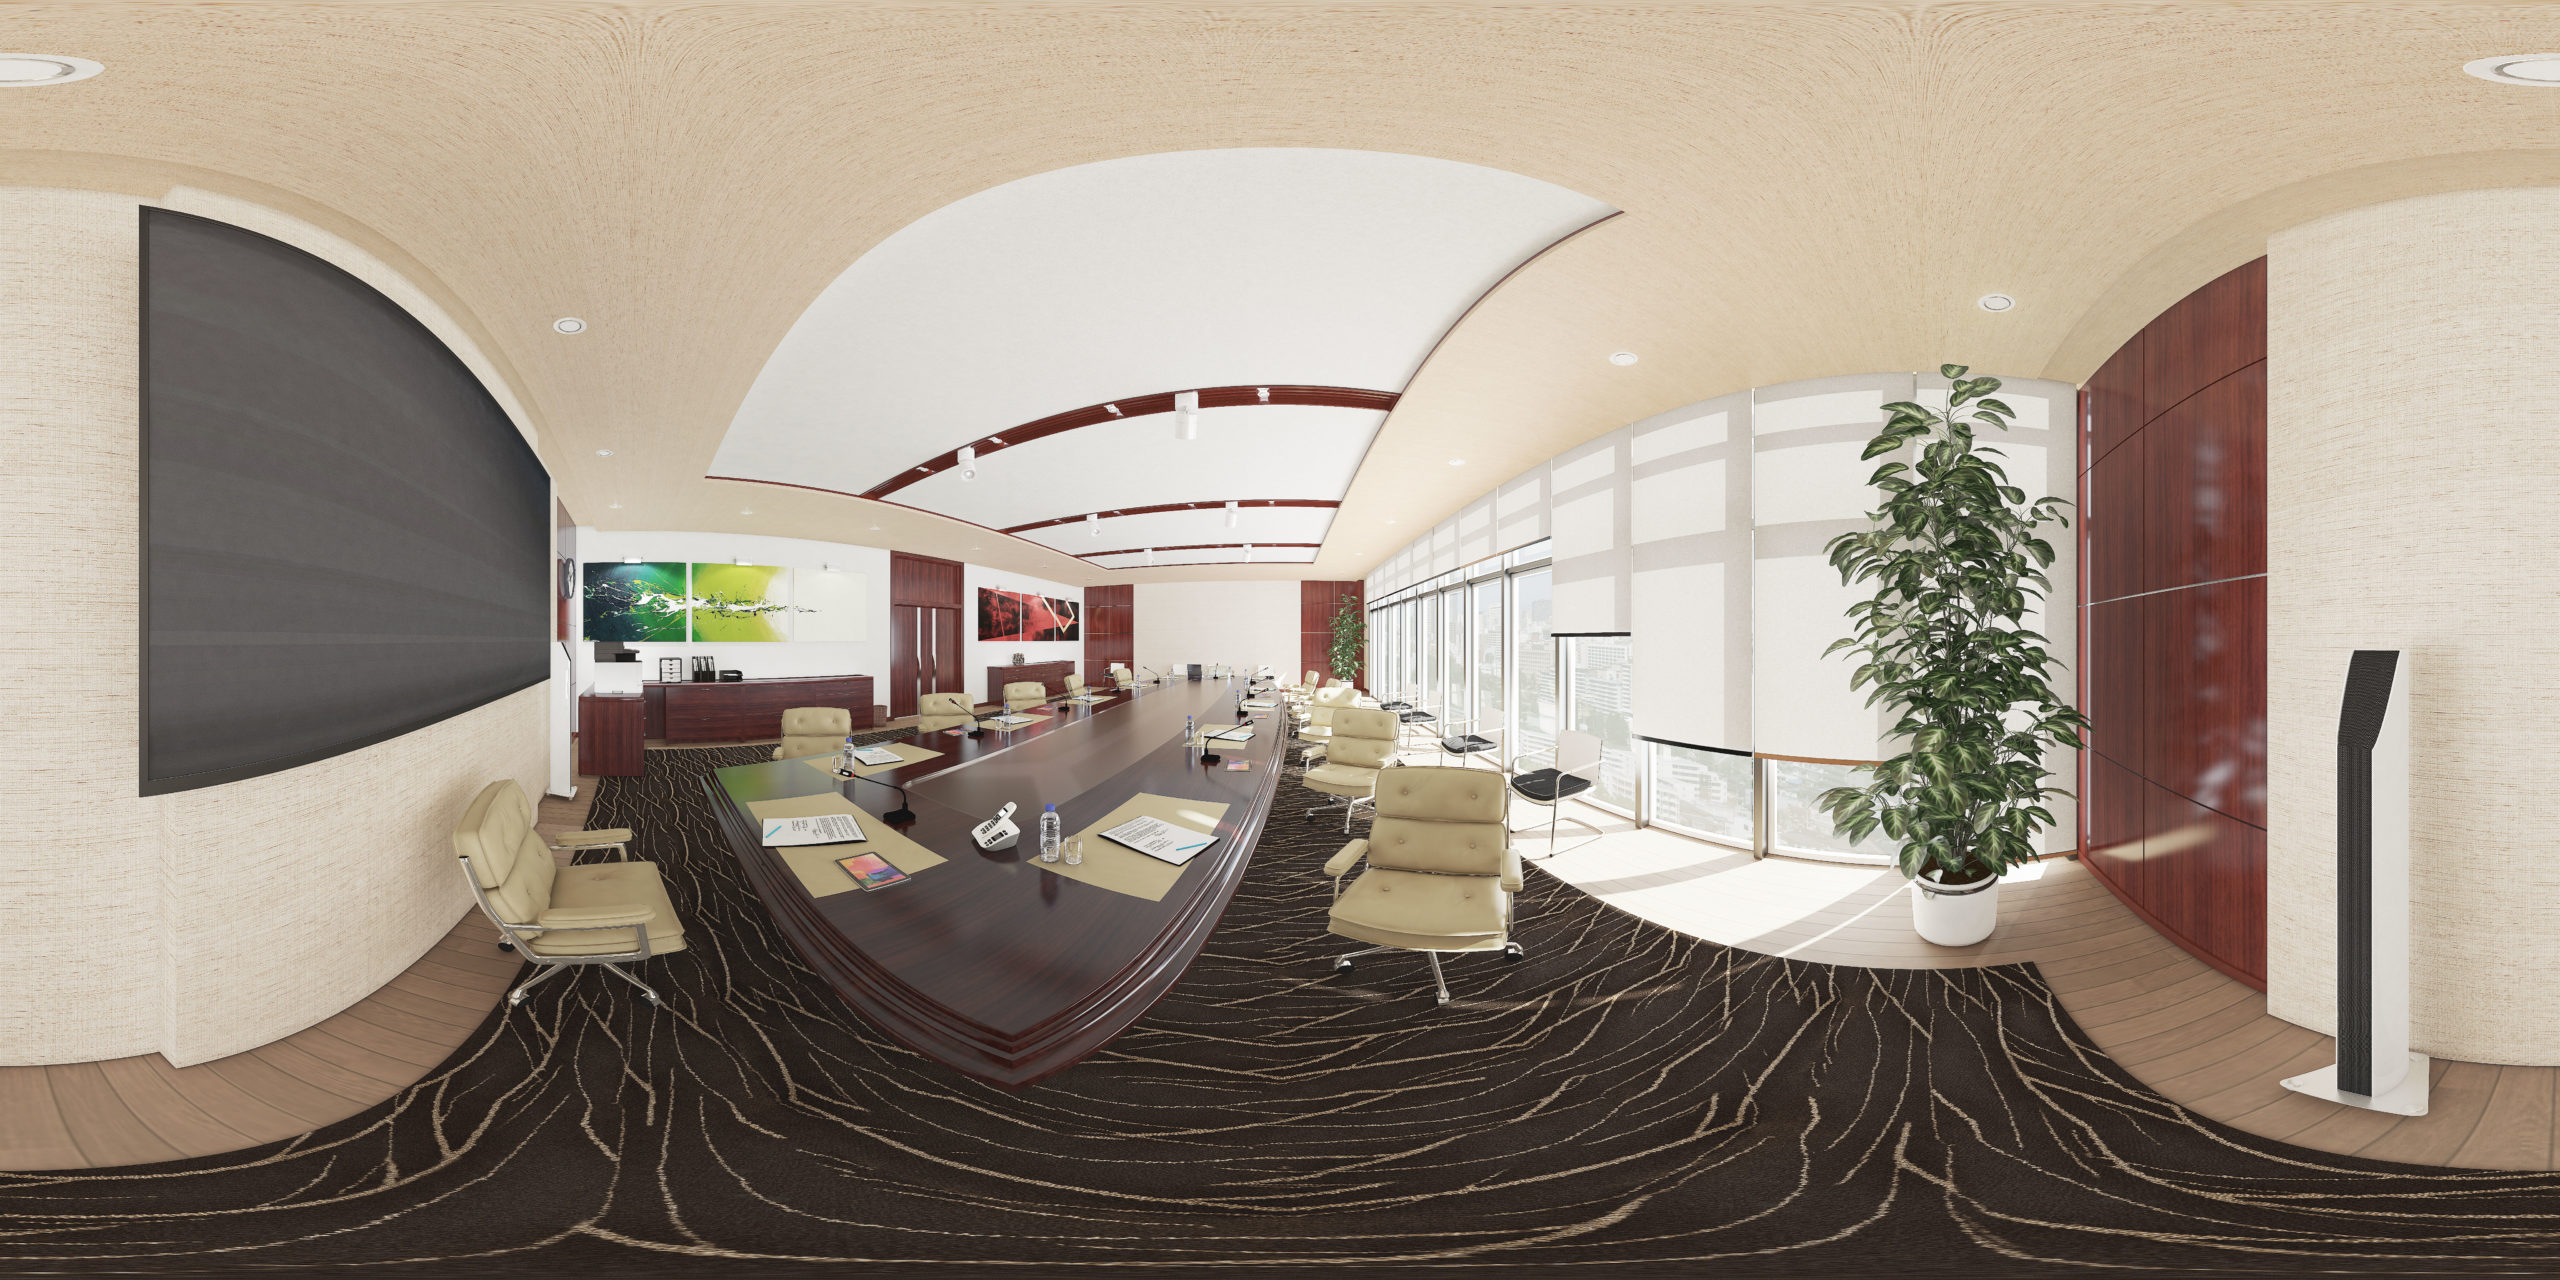
Now that the context is set, let’s see how we can integrate it into VTS. Well, the VR sceneries are just two different 360 sceneries, each one to be displayed to a different eye. As with the more traditional backgrounds, these are composed of several “planes” that allow for a depth effect. Indeed, in this image, certain elements such as the table in the foreground must hide the characters that we will include on the chairs behind it.

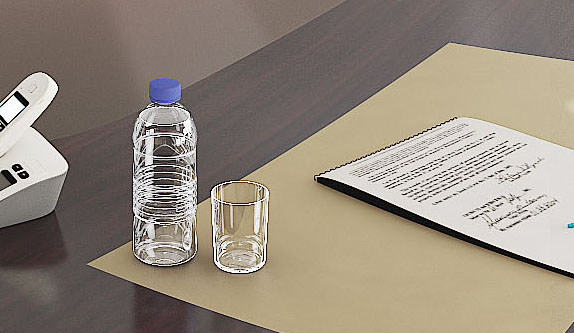
Although these images look very similar, the elements are not exactly the same. If you zoom in very strongly at the same point in the image, you will notice that the elements are shifted. You can see this in the cut on the phone screen on the left, or on the pencil on the right in the example below.

In general, it is not advisable to make VR sceneries with elements that are too close to vision because a bigger difference between these two images will be more difficult for your brain to analyse (we will come back to this later).
Normally, Virtual Reality is made with a 3D modelled sceneries and not still images, so that the user can move in space. For the sake of optimisation and realism, we preferred to keep this system of images, similar to the classic and 360 sceneries, at the expense of the possibility of moving in space, notably by leaning to the side or forward. Thus, the point of view is fixed and only allows the orientation of the gaze. It should be noted that a 3D setting will be displayed in a much less realistic way (or will require a great graphic power to the device) and thus, to choose to lose only this effect of displacement, certainly very immersive, but to gain considerably in realism and in graphic quality seemed to us to be an obvious choice. The characters are present in 3D in the scene. As they are animated, it is important that they are well displayed in this way, so that our two eyes have a very different vision at each moment of movement, whatever their orientation and position.
Why and how to use a VR scenery?
Just as 360 sceneriies can be used in an experience that also includes 2D sceneries, the hardware dimension of using a Cardboard VR means that an experience is either completely in VR or not at all. So this is a crucial decision to consider at the outset of your project.
The benefits of VR
a. Almost total immersion
From the moment the learner puts on the headset, he or she is immersed in a separate reality, a whole new environment to discover. With the different interactions with the characters or the clickable zones that you can set up in the simulation, he or she is not only a spectator of this reality, but also an actor of it. As a result, the learner has the feeling of being part of this new world.
b. Higher retention rate
Once immersed in this world, the learner will want to see the story through to the end. The discovery of new environments and new sensations is an important driver for the learner to enjoy the experience and to be involved in it until the end.
c. A stronger impact
Being a direct actor in this reality, the actions performed have a stronger impact on the user. The latest studies show a memorization rate of around 90% on the content of a VR experience. The innovative aspect of this type of support also allows the learner to be marked, having access to technologies that they are not used to using on a daily basis, making this training much more special and unique than others.
d. A more “new technology” oriented communication
When using VR, one cannot help but consider this technology as “futuristic”. This “new technology” aspect has an impact, most of the time unconscious, on the company’s reputation. In fact, and particularly in a field such as digital training, the technology makes it possible to renew oneself, to offer formats that are a little different, that are out of the ordinary, and that therefore attract more people, while conveying an innovative and modern company image.
The disadvantages of VR
Although VR is very immersive, it has many limitations.
a. Reduced availability
VR requires hardware to work. You need a smartphone powerful enough to display 3D and Cardboard VR glasses at least to play the experience. Then, you need a minimum of space to be able to turn around and look at the whole universe that is offered to you. As a result, although almost everyone has access to a compatible smartphone today, the VR glasses prevent the experience from being easily distributed on a large scale.
b. Some side effects
Indeed, not everyone supports this format. As Cardboard VR is rather generic, it can be uncomfortable for some people, especially in the nose area. As they are not really glasses, the user is also obliged to hold the device over his or her eyes for the duration of the experience. Finally, a fictitious reality with a missing displacement, a reaction time between the user’s displacement and his sight, or a quality that is too low compared to reality, forces our brain to work twice as hard as in its usual environment, which can lead to headaches or nausea if the experience is too long. We advise not to exceed sessions of more than 15 minutes for such experiences.
c. Too much freedom
Surprising as it may seem, this is a constraint. The learner is constantly in a 360° world and, when an action is taking place, they may not be facing the heart of that action. As it is not possible to block the view as with 360° sceneries, it is impossible to prevent the user from wandering around and therefore losing focus on what is happening and what they need to observe. We therefore advise setting up systems with Clickable Zone or Message blocks to ask the user if they are ready to continue the story.
d. The graphic load
As with the 360 sceneries, the images used are not only of high quality (4096x2048px) but are also doubled since they are different for each eye. As a result, these sceneries cannot contain a large number of additional characters, nor a large number of depth shots. These backgrounds are therefore more demanding on the phone’s graphic resources, consume battery power more quickly and may even cause some devices to heat up.
e. Media sites without media
The fact that the two images are slightly different, and therefore the scenery elements are shifted between the two images, makes it very difficult to effectively place a media location in a VR scenery. This is because media locations are defined in the 3D environment, so that their depth can be defined, i.e. whether they are displayed in front of or behind the characters, or even in front of or behind the different planes of the scenery. However, whereas in a traditional setting, depth does not matter, in VR, the closer a media location is to the camera, the more different its position will be between the two visions. Placing media at a point in the scenery for one eye will be easy, but making sure it is also well placed for the second eye will be very difficult. This is a consequence of perspective (remember the experiment with your finger hiding an object). The following diagram explains this principle and will be detailed just below:
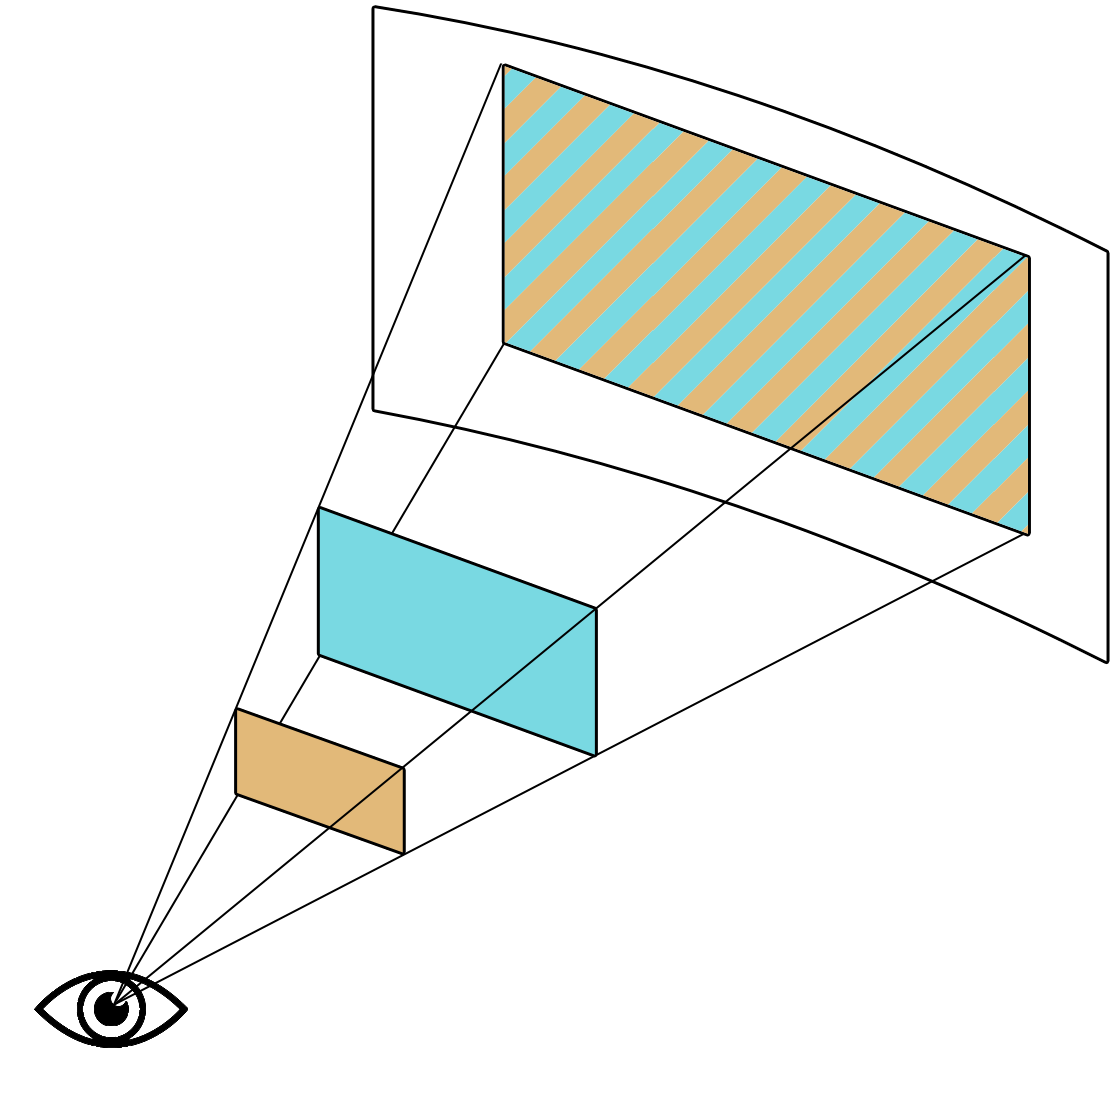
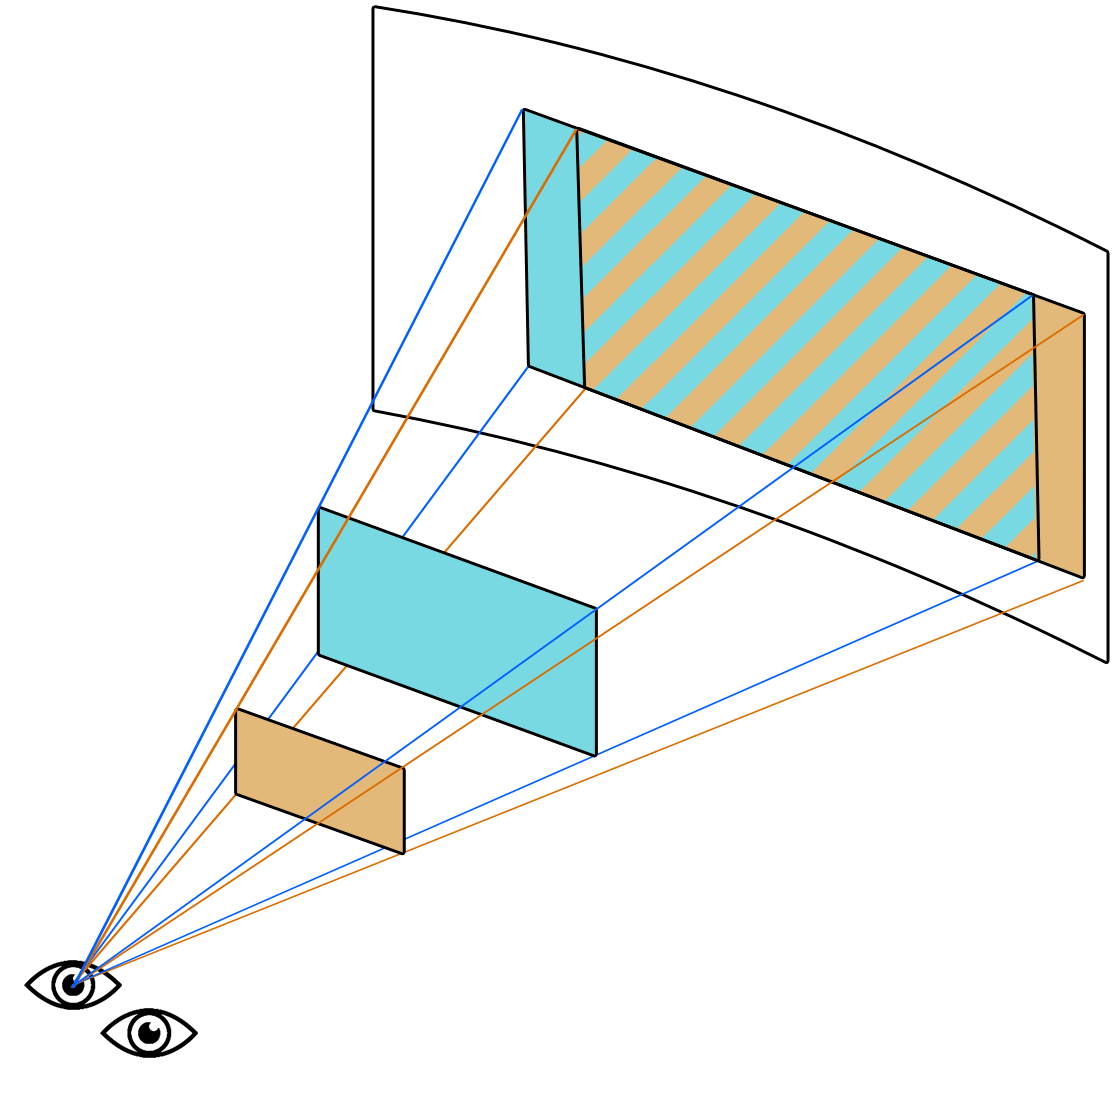
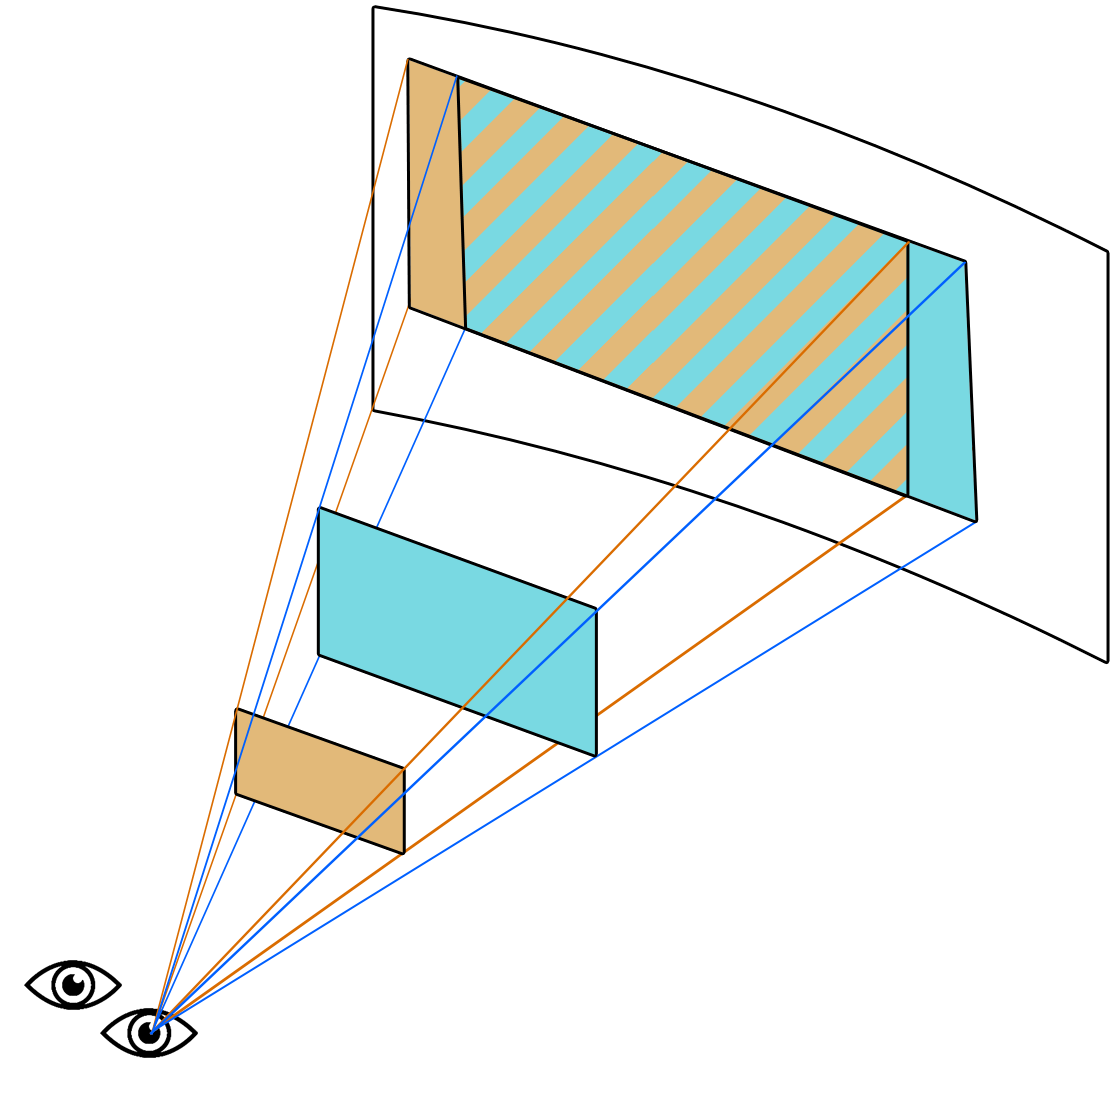
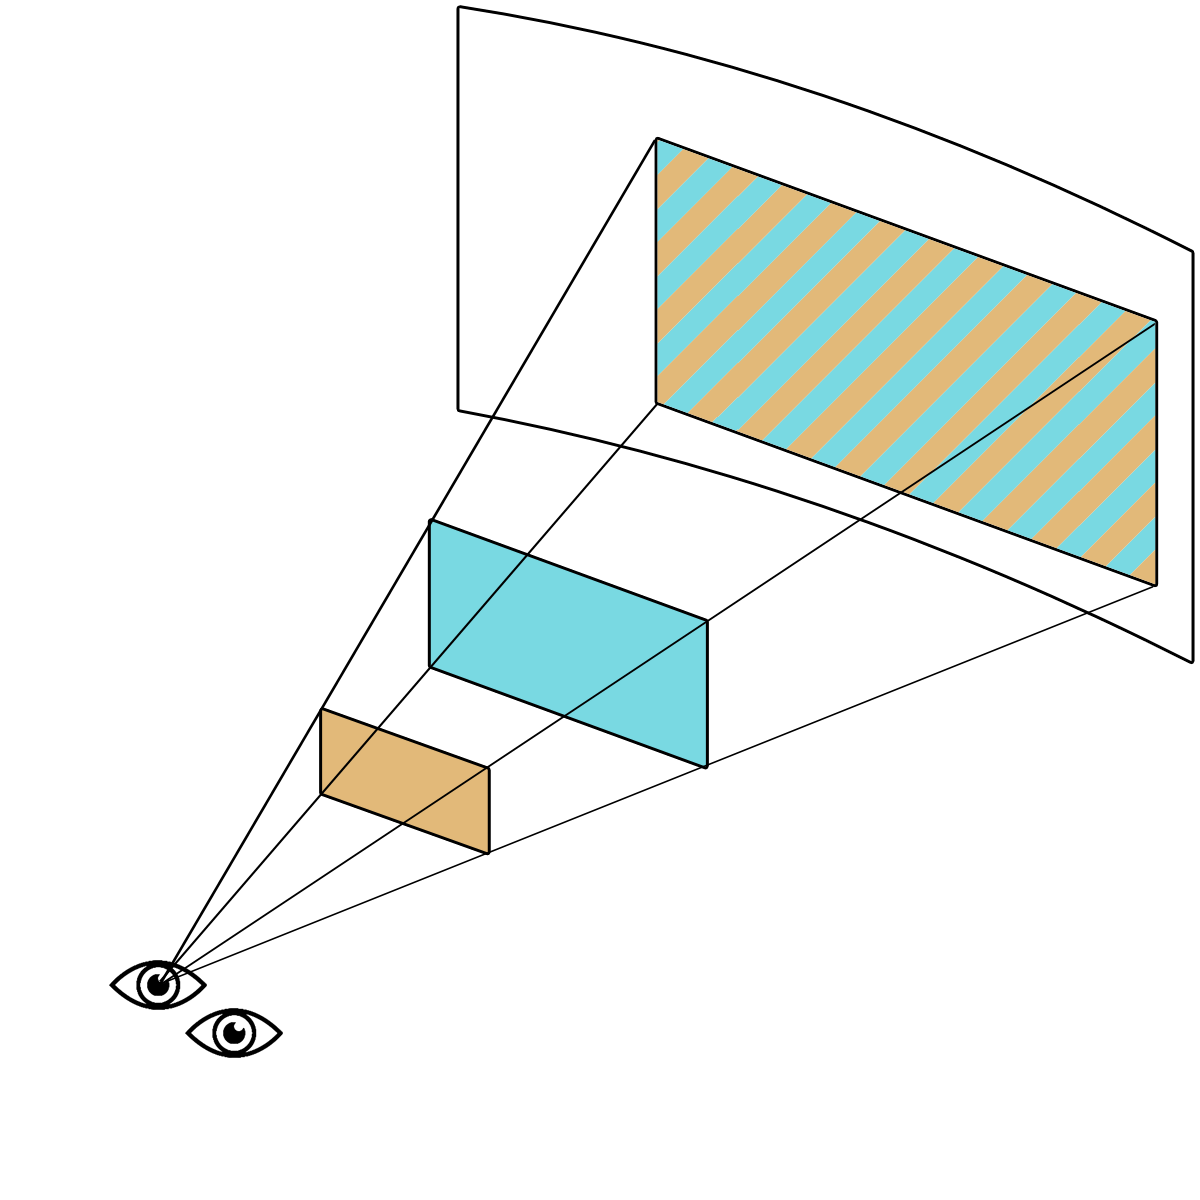
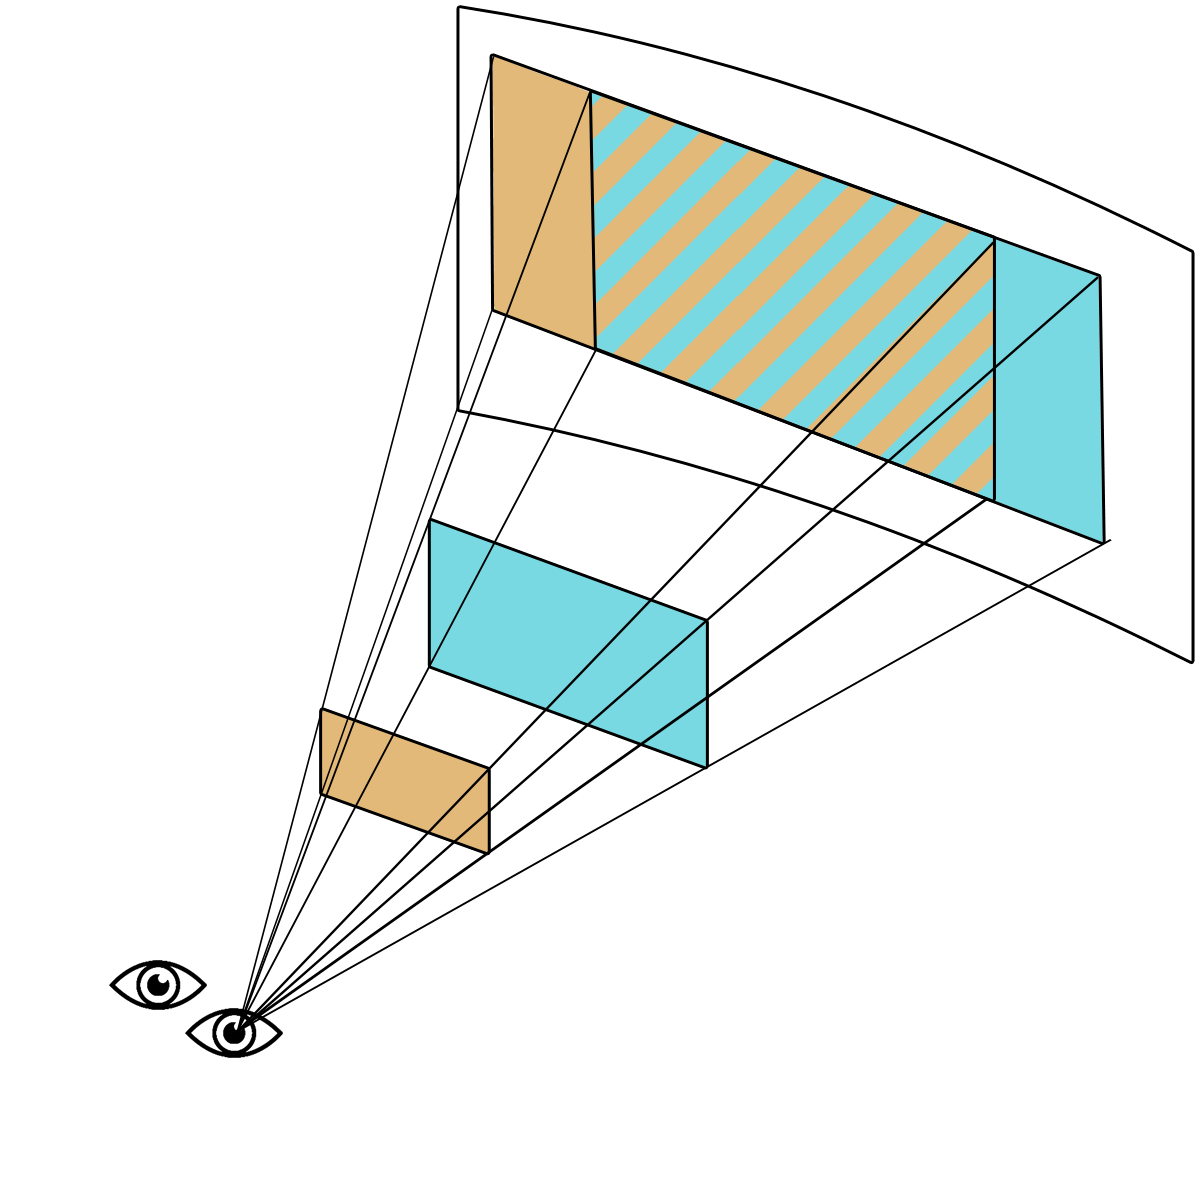
So this diagram shows several things: in a setting with a single viewpoint, whether your media location is further away and larger, or closer and smaller, it doesn’t really have an impact; the visual result will be the same (Fig.1). However, in Virtual Reality, with two fields of view, the depth will have an effect on its display (Fig.2). We also notice that for the right eye, the shift between the two depth planes is reversed compared to the left eye (Fig.3) (the orange area is on the right on the left eye, and vice versa on the right eye). Finally, we can see that if we place the elements perfectly for one eye, the depth will have a very strong impact on the second eye (Fig.4 and 4b). In conclusion, the placement of media requires precision and testing to ensure that the shift effect corresponds to the observed shift between the images. If the element is well placed for one eye, but poorly placed for the other, the human brain will have difficulty appreciating this inconsistency and will tire more quickly. If the location does not contain media and is invisible, this offset will not be a problem and can even be combined with the Click Media block to make areas of the scenery interactive.
When to use VR projects?
So, in view of all this, we recommend several things. First of all, the ideal setting is the presentation area. Whether at a trade show or in a docking station, VR is an effective solution for a “wow” effect and a strong impact on the user. For a larger scale deployment, or for increased accessibility, this solution is not indicated. In general, we recommend that, in addition to the VR version of a project, if this is necessary, a 360° version of your project should be produced, which is more accessible to all.
The use of VR sceneries in VTS Editor
Setting the scene
VR sceneries are more complicated to make yourself than 360 sceneries. Indeed, where a single spherical image may suffice to create a 360 set, two are now required for VR sceneries. But these two images have important additional constraints in order to function as such. All the elements present must be at a completely identical position in the environment on the two images, otherwise the two eyes will send contradictory information to the brain, which will not know how to interpret it. The light must also be identical, the spacing between the two eyes must be respected, …
All these constraints make it very difficult to create a VR compatible scenery with a simple camera. There are specialised accessories but their cost is a budget not to be neglected. This is why all the VR scenery we offer for purchase are made from 3D models. This has several big advantages, such as the fact that you can modify an element and regenerate the image at a lower cost, add a point of view in the scene quickly, not worry about moving elements in the environment or the light, … This solution, although expensive for the modelling, still offers a rendering that is much more easily exploitable and modulable than real life.
It is also possible to create your own VR sceneries, if you have the spherical images, with the VTS Editor configurator (from the INFINITY Pack).

Unlike 360 sceneries, you will be hard-pressed to find such images on sites that specialise in buying images. You will often find a spherical image for one eye but rarely its equivalent for the second. However, although not recommended, if all the elements of the image are far away, then a single spherical image can be used for both eyes. As mentioned above, the further away an element is, the smaller the difference between the two images for that element. For these sceneries, we recommend JPG images for the backgrounds, and PNG images for the foregrounds, with a size of 4096 x 2048 pixels. You can find all these tips and many more in our online documentation.
It is also possible to ask our teams to create a customised scenery for you by contacting the sales department. Similarly, if you are unable to find an environment that meets your needs in our decor bank, our graphic design team can create it for you. Do not hesitate to contact us to let us know your needs in terms of environments so that we can define our next productions in accordance with them.
A different learning experience
As a VR experience is for the Cardboard, it cannot be played other than on a mobile phone. In order to still be able to view it, VTS Editor displays in the scene view only the rendering seen by the left eye. This rendering is also used when previewing your experience in VTS Editor.
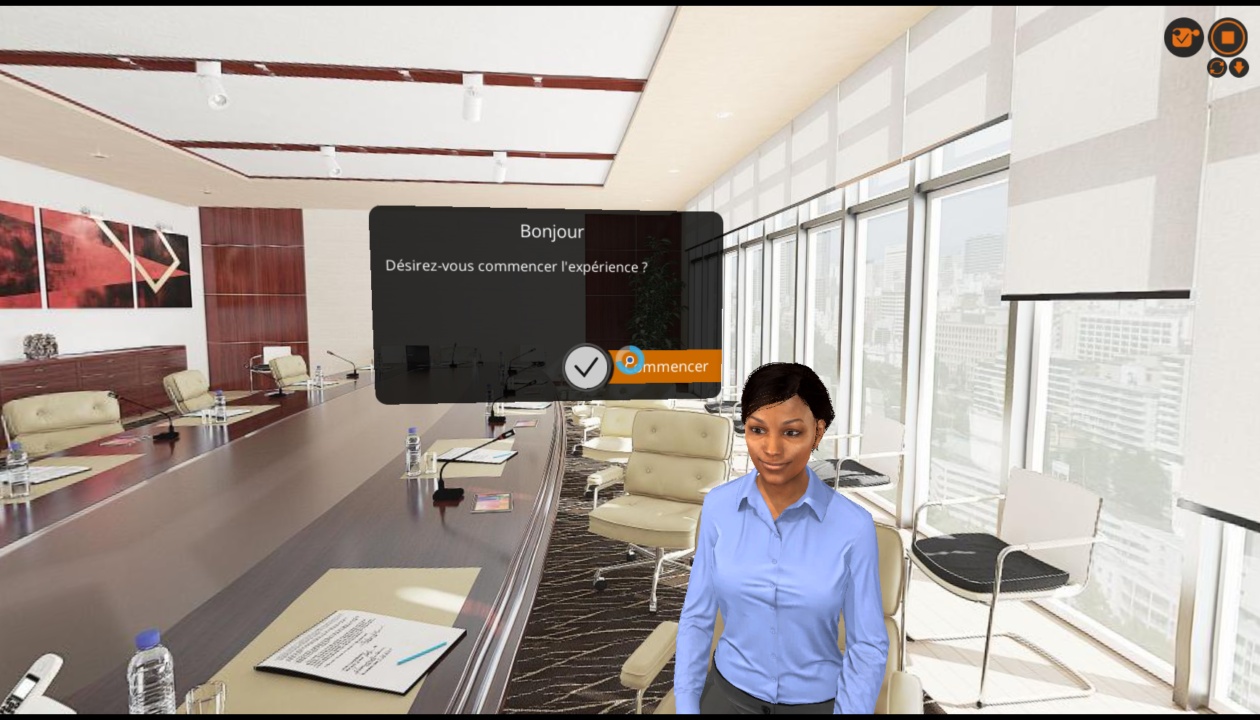
However, in this preview, the controls are also not the same. Indeed, the phone being well embedded in the glasses, it is impossible for the user to touch the screen. It is therefore the orientation of the gaze that will activate the elements. A blue dot appears in the centre of the screen and acts as a cursor for the player. Passing over an area with which he can interact will visually change this cursor into a circular progress bar, which then allows him to validate the interaction after one second.
This preview therefore seeks to simulate the display as the learner will see it when playing the experiment in his virtual reality headset. The only action available to the mouse is to turn the head to point the pointer at the interactive elements of the experience. Being the only control available, many of the more complex blocks of VTS are not accessible in VR, such as the True-False block or Drag & Drop. But also the whole notion of Inventory (and all the blocks associated with it) is no longer appropriate. The Force 360 and Freeze 360 blocks are also unavailable because the view cannot be blocked in a virtual reality headset, otherwise the user would be too destabilized. Some blocks such as the Message block or the Clickable Zones will follow the user’s gaze when they leave their field of vision.
Doing VR other than on Cardboard?
VTS Editor does not allow direct exports for systems other than Cardboard for smartphones, but it is still possible to make custom exports of your VTS projects for more professional Virtual Reality headsets such as Oculus Go, Quest and Quest 2. This request will have to be quoted and studied by our teams in order to best meet your needs. Do not hesitate to discuss this with our teams to find out more about the subject. You will also find a lot of additional information on this page of our online documentation.
Conclusion
Virtual Reality is a very powerful tool with a very strong emotional impact on the user. However, its scope of use is still quite limited and particular. Although very immersive and fun, this powerful tool must be used with moderation and offer a more accessible version depending on the target audience. These strong constraints make it a difficult technology to implement but one that can have an effect that defies all competition. Is it worth the effort? You tell us. The VTS Editor software has a number of cards that will allow you to carry out such a project in this format.
You can discover all these features by downloading the trial version of the VTS Editor software: